Mip-Mapping
I added mipmapping support to the software renderer for my GPGPU project.
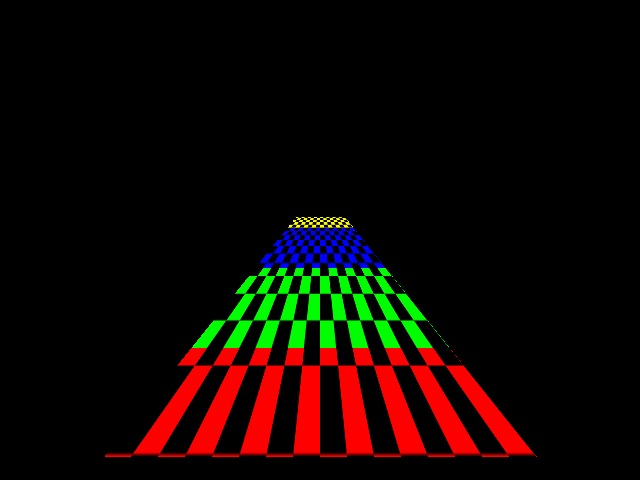
Here’s a quick test image. This is a simple checkerboard rendered onto a square that has been stretched far into the Z direction.

I’ve drawn each mip level with a different color in this experiment so it’s clear where it switches levels. The TextureSampler maintains an array of texture surfaces, with each one being half the size of the previous one. This formula determines which source level to use:
int mipLevel = __builtin_clz(int(1.0f / fabs(u[1] - u[0]))) - fBaseMipBits;
The first interesting part of the equation is here:
int mipLevel = __builtin_clz(int(1.0f / fabs(u[1] - u[0]))) - fBaseMipBits;
Hardware GPUs generally process pixels in quads: 2x2 grids of pixels. One of the reasons for this is that it makes it easier to determine the proper mip level. This renderer works in groups of 4x4 pixels, 16 at a time, the size of each vector register. The pixels are mapped to vector lanes as follows:
 0  1  2  3
 4  5  6  7
 8  9 10 11
12 13 14 15
The ‘u’ and ‘v’ parameters are passed into the texture sampler. They are 16 element vectors that have the horizontal (u) and vertical (v) coordinates for each source texel.
void TextureSampler::readPixels(vecf16_t u, vecf16_t v, ...By subtracting the horizontal coordinate of pixel 0 from pixel 1, we find the horizontal distance between two adjacent texels in texture coordinate space (0.0 to 1.0).
Note that the bracket operator extracts the vector lane using a special instruction. U and V are vector registers, not arrays.
I’ve taken a few shortcuts with this computation:
- I’m only looking at the distance horizontally, which may choose a suboptimal level if it is stretched more in one direction than another. Most hardware implementations look at both horizontal and vertical.
- I apply the same mip level to all 16 pixels based on the distance only of the top two. Most traditional GPUs apply levels independently for each 2x2 quad.
The next step is to convert from the texture coordinate system (0.0 to 1.0) to the raster coordinate space for the source texture. Of course, we need to pick the correct source texture first. I would like the distance between the two adjacent pixels in the destination to be close to one texel in the source mipmap. I can compute the horizontal adjacentTexelDistance using this formula:
adjacentTexelDistance = fabs(u[0] - u[1]) * sourceMipMapWidthI can reverse this and find the source mip map width that would have a distance of one texel. Setting adjacentTexelDistance to 1 and dividing both sides by the distance between the two texels:
sourceMipMapWidth = 1.0 / fabs(u[0] - u[1])Which we see in the formula above:
int mipLevel = __builtin_clz(int(1.0f / fabs(u[1] - u[0]))) - fBaseMipBits;
This is the ideal source mip map width in pixels. This must be rounded to the closest power-of-two texture size. The count leading zeroes instruction does this in one cycle after first converting the width to an integer. This is effectively a logarithm base-2.
int mipLevel = __builtin_clz(int(1.0f / fabs(u[1] - u[0]))) - fBaseMipBits;
Now, it needs to express that as an index into the source texture array. I precomputed log2 of the largest texture size when the sampler was initialized by calling count leading zeroes on the largest mip map width, and stored it in fBaseMipBits. Subtracting that effectively divides by the size because these are logarithms.
int mipLevel = __builtin_clz(int(1.0f / fabs(u[1] - u[0]))) - fBaseMipBits;
There are a few more lines of code after the mip level is computed. It must clamp to the bounds of the array (the computed mip level will be negative if a larger texture than the one provided would provide more detail):
if (mipLevel > fMaxMipLevel)
    mipLevel = fMaxMipLevel;
else if (mipLevel < 0)
    mipLevel = 0;
Finally, it can select the source surface:
Surface *surface = fMipSurfaces[mipLevel];From there, it sample pixels and blends the same way the non-mipmapped version did.
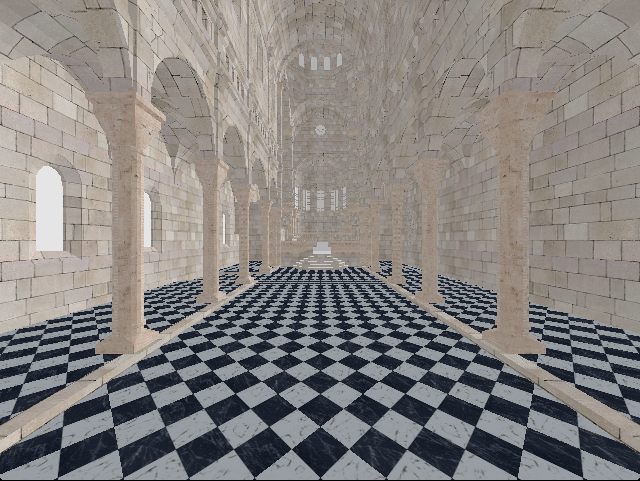
The following images show the difference with some more interesting textures. The top image shows the result with no mipmapping. There is a lot of noise in the more distant pixels. This is aliasing that occurs because we are sampling at too low a frequency. The second image shows mipmapping enabled. It’s subtle, but you can see that the image looks much smoother as it recedes into the distance.


I’m still considering whether to implement a full hardware texture unit or perhaps specialized instructions to accelerate texture blending, but first I’d like to do more performance characterization of the fully software texture sampler.